
By Mike Rosso
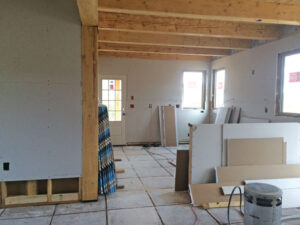
Now that the house has been insulated, the next step is drywall. This is a very exciting step as you truly get the best sense of what the finished rooms look like, and also get an idea of how natural and artificial light reflects around the interior. Drywall is also know by its brand name, Sheetrock. A sheet of drywall includes gypsum, which is essentially a type of rock turned into a powder, and placed in between two pieces of thick paper.
Drywall is hung on the walls and ceilings with drywall screws. Drywall tape is then applied with a thin layer of drywall mud, also known as joint compound, at the seams. The drywallers cut holes in the sheets to accommodate light fixtures and electrical outlets. Having worked as a drywall hanger in my college days, I know how tedious this can be. One wrong calculation and you have to re-cut the entire sheet. We opted for rounded corner bead, known as bullnose. This effect creates a smooth transition at the corners and works nicely with the Southwestern look I was opting for. After the drywall is hung, taped and sanded, a skim coat of drywall mud was applied to smooth out the walls, and in this case, create a subtle texture. It also gives the walls a plaster-like appearance for much less cost. Both the insulation and drywall processes create quite a bit of dust, which had to be mitigated before the next steps – primer and then interior finish paint – can happen. Once the drywall was finished and in place, it was time to make some important and difficult decisions; interior paint colors. I was provided a massive color collection deck through the local Sherwin Williams store, which made my head spin. With the input of various friends whose taste I trusted, I chose some basic off-white colors for the ceilings, hall, utility room and great room. For the kitchen, office and bedrooms, I opted for a variety of colors, including a sage green named Comfort Grey, a pale orange dubbed Hubbard Squash and a darkish blue called Whirlpool. The first step was to prime all the paint surfaces. Priming ensures better adhesion of paint to the surface, increases paint durability, and provides additional protection for the material being painted. At this point I was able to provide some sweat equity in the project, having had some former experience in commercial painting.
 Meanwhile, all interior wooden doors were given a polyurethane varnish finish, as was the locally-sourced Aspen finish trim around the doors, window sills and baseboards.
After the painting was completed, the kitchen and bathroom cabinets and countertops were installed. Ken Emsley of Salida was the finish carpenter, and he custom-built some beautiful Engelmann spruce cabinets for the bathroom. The kitchen cabinets were purchased from Home Depot, which offered the best value for the cost. I choose a Formica-type product for the countertops for it’s durability and functionality. The bar top, a lovely eight-foot slab of sanded and finished sycamore, with two live edges, was found quite accidentally at an Amish furniture store in Westcliffe. I was browsing the finely crafted furniture when I happened to notice some finished wooden slabs resting against a wall. My eye was drawn to one which was the perfect size for the bar, but the price was a bit steep. I decided to hold off and check in with the builder and Ken to make sure this would work for me.
After they gave me the go ahead, I contacted the store and the price had magically decreased by fifty percent! Without hesitation, I offered up my credit card, and they even delivered it to Salida at no extra charge. Ken then did a nice job of trimming the countertops with a darker hardwood to match the bar top. I also got lucky with the master bedroom doors. After seeing a Facebook ad on Salida Swap for some doors for sale, I drove up to the shop of a custom door builder in Nathrop, Jeff Bevin. After asking if he had any other doors for sale, he shuffled some inventory out of the way and revealed some beautiful beetle-kill doors he’d made a few years back. When he told me the price, I did not hesitate, wrote him a check and laid them gently in the back of my pickup. They now grace the master bedroom.
Next month, the doors are hung, the baseboard, window trim and sills are installed, the floor gets finished, the shower gets tiled and the appliances and plumbing fixtures are installed.