
By Mike Rosso
In the previous installment of this series, the framing of the exterior and interior walls of the new house had begun. The west end, or bedroom wing of the house, has trusses in place with soffit boards installed and sheathing on all walls, and in a staggered pattern on the roof to provide wind stability. Although we had been lucky with no measurable amount of moisture, anyone who lives in Chaffee County knows that our mild weather is the result of a constant wind pattern. A strong wind at the wrong time can distort the vertical framing of the walls into a leaning wall. At this point, it was important to get the roof on and the house “dried in” as we were beginning to move into the winter months.
This involved quite a few major steps. First, sanded aspen planks were laid above the spruce beams in the great room, creating the ceiling. The ceiling boards act as a floor on which to perform roof framing, and to create the diaphragm that makes the home stable. There was a small change made in the roof framing plan, as this process was underway, which allowed for me to have a small attic storage area with pull-down stairs for access. Once the aspen planks were installed, and the floor of the small loft was floored with OSB, using various sized rafters, the roof framing was put in place. It was covered with the same OSB as on the trusses, and then continued over the rafters. The rafters stopped at the outside edge off the walls, and 2×4 extensions were married to their sides, which extended them to create the same finished soffits to match the trusses. The entire roof structure was covered with a moisture barrier to protect the now-completed framing. Our luck held out, as last winter began and continued unseasonably dry.
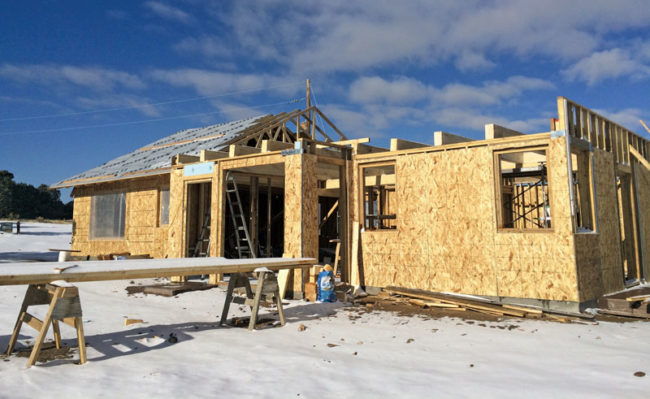
During the process of putting the “lid” on the structure, the windows were covered with polyethylene plastic sheeting to keep out the elements, and help to insulate the interior. This does not change the temperature of working in the winter, but it does reduce the wind chill that accompanies the cold. The roofing chosen was locally-rolled, corrugated steel. This pattern was a very common type roofing style at the turn of the century – that would be the nineteenth century. My primary aesthetic design goal was to have a ”New Mexico territorial style” home. Part of that style is design and part is finished elements. The exposed wood rafter tails and soffits, and wood-covered beam work are part of that, and because it is a traditional product, corrugated roofing lends itself to the territorial era.
By early January, the house was dried in and it was really starting to look like a home. As the interior walls went up, you could get a good feel for the layout, the room sizes and the effects of natural light on the interior. Next month we will talk about the length of sunlight that enters the home.
By mid-January, the doors and windows had been installed and the electrical wiring and boxes were nearly all in place. The electrician, George Hardgrave, had come out of retirement to run the wiring throughout the house. This included junction boxes and fixtures for the recessed LED lamps which were utilized throughout the house, as well as pre-wiring the radiant wall heaters.
My plan from the beginning was to heat my home with solar gain and locally-sourced firewood. That does not conform to building code standards, which have stringent requirements that force compliance with the needs of Big Energy to suck fossil fuels out the ground. I’d like to eventually heat with solar hot water, and did install tubing in the concrete floor to allow for that. Limited financial resources and code compliance do not allow that with wood backup, so electric heat is the least expensive way to allow me the freedom of using renewables where appropriate, as the technology matures.
I know how to use light switches and other forms of electricity, but knowing where everything needs to be for convenience of living in a finished house is beyond me. That made George a hero. Deciding where to put the switches and outlets, as well as their particular function, was one part of the “rough in” process. I am thankful for how well it turned out.
One of my new neighbors is Mike Argys of Argys Plumbing. As you can imagine, this was a happy coincidence and quite convenient that his team performed the magic that is called plumbing. Hot and cold water lines had to be installed within the interior framing, taking special care to ensure they were not in locations that would allow them to freeze and possibly break once the home was complete. The sewer lines are also extended from below the floor to elevations that allow finished plumbing attachments. These lines also need vents to keep traps from being sucked dry when water flows out of a sink or tub to the outside sewer system. All of this plumbing is done with the safety of the water supply in mind so that fresh water is always fresh.
As for me, the homeowner, I began researching appliances. This included washer and dryer, range, refrigerator and dishwasher. Since the house was to be all-electric, I kept that in mind and went with Energy-Star rated units and chose mid-line priced products. The Internet was a great help with this as I was able to read user reviews, plus find many sources which rated appliances by cost, reliability and performance.
Next month, the insulation is installed and the drywalling begins.