By Mike Rosso
In the first installment of this series, we had just completed the dirt work for the new house, and were now ready for the foundation, stem wall and floor.
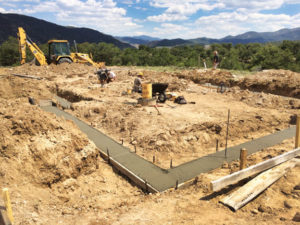
The first step was to form and pour concrete around the rebar in the footings. The footings equalize the load of snow and wind that buffet the house through the exterior bearing walls and interior load bearing posts. Since the home was designed with a covered exterior porch on the east side, column footers were also poured to support posts holding the porch beams. To prevent a frozen water line, it was trenched below the anticipated extreme frost line from the well to a location in the home where the pressure tank will be located before any footing work occurs. The sewer line was also brought in early to assure proper depth and drainage. After the concrete had dried and cured, the forms were removed. Once again, we had great luck as the weather remained dry and consistent, perfect conditions for the foundation. Once the footing has cured, the forms were set for the stem wall, which will support the structural framing of the house. These are anchored and tensioned with rebar and metal plates. They are also insulated with polystyrene foam on the interior. After the stem wall and support pylons have cured, the interior is back-filled and compacted.

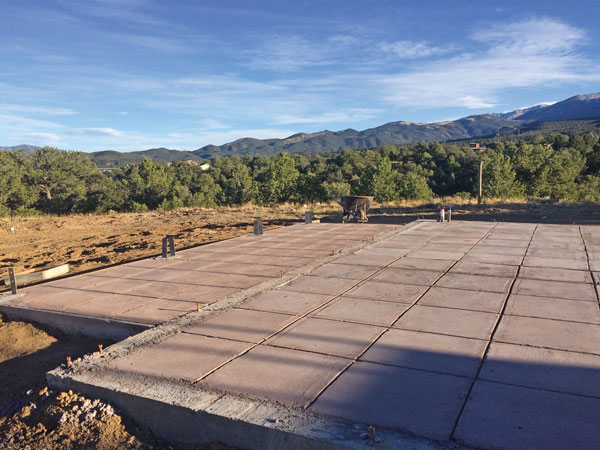
Now it’s the plumber’s turn (who conveniently lives next door.) Sewer lines are continued with proper size and slope. When the hot and cold water lines are established and put in place, things get pretty exciting. It’s almost time to pour the finish floor. Before that happens, styrofoam insulation is put in place. This stabilizes the temperature of the slab so that it can become part of the passive heat and cooling system for the home. Flex tubing is attached to metal reinforcement wire that runs to a central location in the utility room in the event I want, in the future, to employ an active solar, in-floor radiant heat system. Now it was time to bring in the concrete truck for a series of detailed concrete slabs (see photo), I chose a base color for the floors which most closely resembled the soil surrounding the home. In retrospect, this turned out great, as any dirt which makes its way into the house tends to blend with the floor. Not that I am a sloth, I am just too busy to be constantly cleaning.
The first concrete truck showed up on a hot and windy day, which gave the finishers a bit of a fit – they employed a different “F” word. The concrete was leveled and tooled to mimic the look of adobe tile. The workers weren’t given much time before the concrete began to harden and cure, but in the end, the floors turned out great.
Work could now begin on framing the house. The first order of business was to raise a wall on which we could attach a power box, as we would be needing electricity to power the framing tools. Our local electric provider, Xcel Energy, had quite a backlog due to the sheer volume of construction projects going on in this region, as well as being short-staffed. In the meantime, the builder had to employ a generator to run the tools. Not the ideal situation, but at least the framing could begin.
Most modern, stick-built construction involves the use of 2×6 wood studs (vertical) and plates (horizontal) for exterior walls. The lead carpenter, Kirby Perschbacher, employs a unique, double 2×4 building style in which the 2×4 studs are staggered on separate plates, creating an eight-inch wall with more air space for insulation, and limited conductivity between the outside temperature and the inside. The result of this is a thicker wall with inset windows, resembling the walls found in an adobe or straw bale structure. For my vision of a New Mexico territorial-style, this is a great choice and increases the R-value greatly. R-value is a measure of how well an object, per unit of its exposed area, resists conductive flow of heat. The higher the R-value, the greater the insulating effectiveness.
The framing began in earnest in early November 2017 with the weather holding up just fine. This was probably the most exciting part of the construction project, as the walls start going up and the window frames appear. The house is beginning to take shape.
We’ll pick up there next month.